

How To Retrieve All Data From Table Vuejs Asp.net
How to build a real-time editable data tabular array in Vue.js
In information-driven applications, a data table is used to display information in a tabular format and with the ability to edit and delete records in place. Working with Vue at that place are different open-sourced components that can exist used to easily add a information table to your application. Many applications today have real-time features and you may inquire, how do I make editing and deletion of information synchronised in real-time? There are 3 options you tin adopt for this. They are:
-
Utilise WebSocket API. This is not a adept option if some of your users are using browsers that don't yet back up WebSocket.
-
Use a library that abstracts away these cross-browser differences with a fallback mechanism. Libraries such equally Socket.IO, SignalR, and SockJS. With this choice, you'd have to manage the server that handles a large number of open connections and deal with scaling.
-
Use a service that provides a library that does the same thing as the previous option merely manages the server and scales appropriately. This is a preferable option for companies and teams that are adopting (or accept adopted) the serverless approach.
I'll show you how to build a real-fourth dimension editable information tabular array in Vue.js using Hamoni Sync as the real-time land synchronisation service. The movie beneath shows what we'll build:

To follow along you'll need to take some bones knowledge of Vue. If you have no knowledge of Vue, yous tin can read my previous postal service to become up to speed with Vue.js. You'll also demand the post-obit tools:
-
Node.js & npm (follow the link to download an installer for your OS)
-
Vue CLI to scaffold a new Vue projection. If you don't accept this, run
npm install -g vue-cli@two.9.half dozenfrom the command line to install it.
Ready the project
We'll set up upwards the projection using Vue CLI and a template from Vuetify. Open up the command line and run the command vue init vuetifyjs/elementary realtime-datatable-vue. You lot'll get asked for a name and an author, accept the default value by striking enter for each prompt. This will scaffold a new Vue project with a unmarried alphabetize.html file. This file contains script references to Vue and Vuetify. Vuetify is a Cloth Design Component for Vue.js. Information technology has a v-information-table component with features for sorting, searching, pagination, inline-editing, header tooltips, and row pick.
Add together the data table component
Open up the file alphabetize.html with your text editor (or IDE). Replace the content on line 50 with the following:
<div> <v-dialog 5-model="dialog" max-width="500px"> <v-btn slot="activator" color="primary" dark form="mb-2">New Item</v-btn> <five-card> <v-bill of fare-title> <bridge class="headline">{{ formTitle }}</span> </v-card-title> <5-bill of fare-text> <v-container grid-list-md> <v-layout wrap> <v-flex xs12 sm6 md4> <five-text-field v-model="editedItem.name" label="Dessert name"> </v-text-field> </v-flex> <v-flex xs12 sm6 md4> <v-text-field v-model="editedItem.calories" label="Calories"> </v-text-field> </v-flex> <5-flex xs12 sm6 md4> <v-text-field v-model="editedItem.fatty" label="Fat (g)"> </5-text-field> </five-flex> <v-flex xs12 sm6 md4> <5-text-field v-model="editedItem.carbs" label="Carbs (g)"> </5-text-field> </5-flex> <5-flex xs12 sm6 md4> <five-text-field v-model="editedItem.protein" label="Protein (thousand)"> </v-text-field> </v-flex> </v-layout> </v-container> </v-carte-text> <v-card-actions> <v-spacer> </v-spacer> <v-btn color="blue darken-1" flat @click.native="close">Cancel</v-btn> <five-btn color="blue darken-ane" flat @click.native="salve">Save</v-btn> </v-carte-actions> </v-card> </v-dialog> <v-information-table :headers="headers" :items="desserts" hide-actions class="tiptop-i"> <template slot="items" slot-scope="props"> <td>{{ props.item.name }}</td> <td class="text-xs-right">{{ props.particular.calories }}</td> <td class="text-xs-right">{{ props.item.fat }}</td> <td class="text-xs-right">{{ props.particular.carbs }}</td> <td course="text-xs-right">{{ props.item.protein }}</td> <td class="justify-center layout px-0"> <5-btn icon class="mx-0" @click="editItem(props.item)"> <v-icon colour="teal">edit</5-icon> </5-btn> <v-btn icon form="mx-0" @click="deleteItem(props.item)"> <v-icon color="pink">delete</five-icon> </5-btn> </td> </template> </v-data-tabular array> </div> The lawmaking to a higher place adds a five-dialog component for displaying a dialog to collect data for new records or editing an existing tape. Likewise, the v-data-tabular array which renders the tabular array. We need to define the data and methods used by these components. After line 126, add the following code to the data properties:
dialog: false, headers: [ { text: 'Dessert (100g serving)', align: 'left', sortable: fake, value: 'proper name' }, { text: 'Calories', value: 'calories' }, { text: 'Fat (g)', value: 'fat' }, { text: 'Carbs (g)', value: 'carbs' }, { text: 'Protein (m)', value: 'poly peptide' }, { text: 'Actions', value: 'name', sortable: false } ], desserts: [], editedIndex: -1, editedItem: { name: '', calories: 0, fat: 0, carbs: 0, poly peptide: 0 }, defaultItem: { name: '', calories: 0, fatty: 0, carbs: 0, poly peptide: 0 }, listPrimitive: zippo The desserts data property volition hold the information to be displayed in the table. The editedItem property will hold values for the record being edited, and the editedIndex volition hold the alphabetize of the record being edited.
Add together the following properties later the data property definition, after line 189:
computed: { formTitle() { render this.editedIndex === -1 ? 'New Item' : 'Edit Particular' } }, watch: { dialog(val) { val || this.shut() } }, We added a computed and watch property. The computed belongings defines formTitle which gives the dialog component a championship based on the value of editedIndex. The lookout property watches dialog for when its value changes. If the value changes to imitation, it calls the function close() which volition be divers afterward.
Add Hamoni Sync
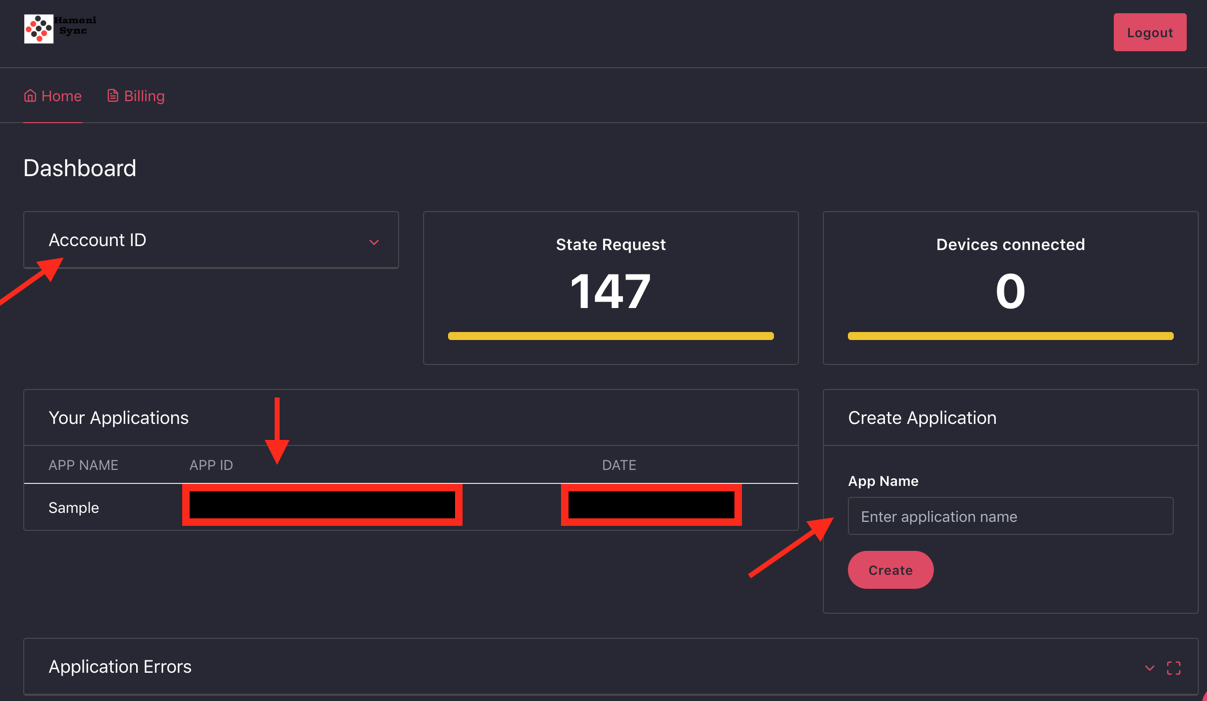
At this junction we need to add Hamoni Sync. It is used to synchronise the application state, and handles conflict resolution to avoid i user overriding another user's data. To utilise Hamoni Sync you'll have to sign upwardly for an account and application ID. Follow these steps to create an awarding in Hamoni.
- Annals and login to Hamoni dashboard.
- Enter your preferred awarding proper noun in the text field and click the create push button. This should create the app and brandish information technology in the application list department.
- Expand the Business relationship ID card to get your account ID
Beneath the script reference to Vuetify on line 139, add a reference to Hamoni Sync
<script src="https://unpkg.com/hamoni-sync@ane.1.1/hamoni.dev.js"></script> Then we need to initialise Hamoni Sync one time the Vue component is mounted. Add a mounted property below the watch belongings
mounted: function () { const accountId = "YOUR_ACCOUNT_ID"; const appId = "YOUR_APP_ID"; allow hamoni; fetch("https://api.sync.hamoni.tech/v1/token", { method: "POST", headers: { "Content-Type": "application/json; charset=utf-8" }, trunk: JSON.stringify({ accountId, appId }) }).then( token => { hamoni = new Hamoni(token); hamoni.connect().and so( () => { hamoni.get("vue-tabular array").then( archaic => { this.listPrimitive = primitive this.desserts = [...archaic.getAll()] this.subscribeToUpdate() }).grab( error => { if (fault === "Error getting state from server") this.initialise(hamoni); else alarm(error) }) }).catch(alert) }) }, From the code above we initialise Hamoni Sync with a token from Sync'due south token API. You need an account and application ID inorder to get an hallmark token from the API. Replace the string placeholders with the account and application ID from the dashboard. It is recommended calling the Sync token server from your backend and sending the response token to the client application. For this case, I kept them all in 1 place.
And so information technology is connected to the Hamoni server by calling hamoni.connect() which returns a promise. Once connected, we call hamoni.get() with the name of the state stored in Hamoni. In social club to retrieve a state from Hamoni, it needs to have been created otherwise it'll render an error. What I've done here is handle this error inside the catch cake, such that it calls another function to initialise the state in Hamoni Sync. If the telephone call to get an application state succeeds, it returns an object which volition be used to modify data independent in that state. This object is referred to as a Sync primitive. There are 3 types of Sync primitives:
-
Value Primitive: This kind of state holds simple information represented with datatypes like string, boolean or numbers. Information technology is best suited for cases such as unread bulletin count, toggles, etc.
-
Object Primitive: Object state represents states that can be modelled as a JavaScript object. An instance usage could be storing the score of a game.
-
List Archaic: This holds a list of state objects. A state object is a JavaScript object. You can update an detail based on its index in the list.
We've used a list archaic for this example. We phone call archaic.getAll() to get the state and pass it to desserts. After that information technology calls the function subscribeToUpdate(). This function will be used to subscribe to state change events from Hamoni Sync.
Add the following code after the mounted property on line 215:
methods: { initialise(hamoni) { hamoni.createList("vue-table", [ { proper name: 'Frozen Yogurt', calories: 159, fat: 6.0, carbs: 24, protein: 4.0 }, { name: 'Ice cream sandwich', calories: 237, fat: 9.0, carbs: 37, protein: iv.3 }, { name: 'Eclair', calories: 262, fat: 16.0, carbs: 23, protein: 6.0 } ]).then( archaic => { this.listPrimitive = primitive this.desserts = this.listPrimitive.getAll() this.subscribeToUpdate(); }).catch(alarm) }, subscribeToUpdate() { this.listPrimitive.onItemAdded( detail => { this.desserts.push(item.value) }) this.listPrimitive.onItemUpdated( item => { //update the item at particular.alphabetize this.desserts.splice(item.index, 1, item.value); }) this.listPrimitive.onItemRemoved( item => { //remove the item at item.alphabetize this.desserts.splice(particular.index, ane); }) }, editItem(item) { this.editedIndex = this.desserts.indexOf(detail) this.editedItem = Object.assign({}, item) this.dialog = true }, deleteItem(item) { const alphabetize = this.desserts.indexOf(detail) confirm('Are you sure you want to delete this item?') && this.listPrimitive.remove(index) }, shut() { this.dialog = imitation setTimeout( () => { this.editedItem = Object.assign({}, this.defaultItem) this.editedIndex = -1 }, 300) }, save() { if (this.editedIndex > -ane) { this.listPrimitive.update(this.editedIndex, this.editedItem) } else { this.listPrimitive.add(this.editedItem) } this.close() } } The code above defines the functions we've been referencing thus far. The initialise() function creates the listing archaic with name every bit vue-table. The subscribeToUpdate() functions comprise lawmaking to handle when an item is added, updated or deleted from the list primitive. The deleteItem() office removes an item from the list archaic past calling listPrimitive.remove(index) with the alphabetize of the item to remove. The save() office calls listPrimitive.add together(editedItem) to add a new detail to the list primitive, and listPrimitive.update(editedIndex, editedItem) to update the record at a certain alphabetize.
This is all the code that'south needed to reach our objective of a real-time editable data table. Open the index.html file in your browser and the application is ready to apply!
That's A Wrap!
We've built a existent-fourth dimension editable data table in Vue.js. Hamoni Sync makes it easy to add together real-time functionality. Both Vuetify and Hamoni Sync accept npm packages if you're working with a build system and using single file components. You can find the source lawmaking on GitHub.
Resources
- Hamoni Sync (docs)
- Vuetify
- Vue CLI
- Introduction to Vue.js essentials

How To Retrieve All Data From Table Vuejs Asp.net,
Source: https://www.codementor.io/@pmbanugo/how-to-build-a-real-time-editable-data-table-in-vue-js-kuxfvb215
Posted by: burkemasimed.blogspot.com
0 Response to "How To Retrieve All Data From Table Vuejs Asp.net"
Post a Comment